Introduction
Some batteries are regulated as dangerous goods because they may pose hazards during transport. These hazards include: Leaks of corrosive liquid or other material that can injure people or harm the environment. In this article we will discuss about – Dry Goods Lithium Button Battery Assembly & Test.
1. Button Battery Preparation & Assembly
- Positive ingredient active material: PVDF: Conductive agent (acetylene black) = 8: 1: 1
- Negative active material: PVDF: conductive agent (acetylene black) = 7: 2: 1
- Solvent NMP is determined according to material conditions, empirical value
- Coating is s imply coated with a coating sample maker
- Dry naturally at 60 °C, vacuum dry at 1 10 °C (24 h). I f the water molecules are in the material lattice, the drying temperature is 60 – 70 °C 5 Put the positive and negative electrodes into the vacuum glove box for assembly
Note: 1.) Regardless of the positive electrode material or the negative electrode material, they are assembled as the positive electrode, and the lithium sheet is the negative electrode
2.) 2016 and 2025 lithium button battery assembly diagram is as follows

Buy Now: SEMCO Infratech – Fully Automatic Lithium Battery Equalizer A 24 Way
2. Cyclic Voltammetry (CV method) Test Steps for Button Cells
- Using a three- electrode system, the working electrode (green) is connected to the positive electrode, and the reference electrode (white) and the counter electrode (red) are connected to the negative electrode
- Open the electrochemical workstation, click Control— Open circuit potential OCV, and record the open circuit potential.
- Then select Cyclic Voltammetry CV.
- Parameter setting: The Initial potential I unit is OCV potential, the high potential High is 5 V, the low potential Low is 1. 5 V, the final potential Final is 5 V, the sensitivity is 1e – 6, and the scanning speed scan rate is 0.1mV/s.
- Click Run
3. Button Battery AC Impedance Test Steps
- Using a three-electrode system, the working electrode (green) is connected to the positive electrode, and the reference electrode (white) and the counter electrode (red) are connected to the negative electrode,
- Open the electrochemical workstation, click Control— Open Circuit Potential, and record the open circuit potential,
- Then, select the AC impedance EIS.
- Parameter setting: The Initial potential is OCV potential, the high frequency is 1 e- 5 Hz, the low frequency is 1 e- 1 Hz, and the amplitude Amplitude< 10 m V.
- Click Run.
Buy Now: SEMCO provide high-quality Battery Balancer to measure the voltage, resistance, and more.
Note: 1.) EIS test should be carried out before and after the Lithium charge cycle,
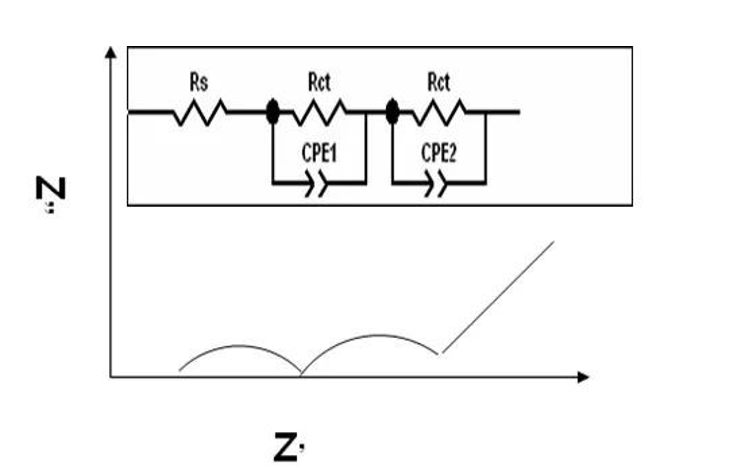
2.) Data analysis uses Z view professional software for fitting and analysis of Li+ transition in different phases,
3.) The fitting circuit diagrams of different EIS diagrams are as follows


4. Button Battery Charge and Discharge Test Steps
- Turn on the charging and discharging instrument and set the step: 0. 2 C,
- The tested capacity is the positive and negative capacity.
More Articles:
MSDS For LiFePO4 Battery Pack,
Power Battery Pack Technology,
Best Way of Charging Lithium Batteries,
Analyze Common Bulging Reasons for Lithium Batteries,
Aging of NCA Lithium Batteries,
Function and Components of Battery Pack & BMS,
Cell BMS Pack Failure Analysis,
Lithium Battery Protection Board,
Basic Knowledge of Lithium-ion Battery Commercialization,
Action protector in electric vehicle charging system,
Production problems of lithium batteries,

